
Agent
Published:
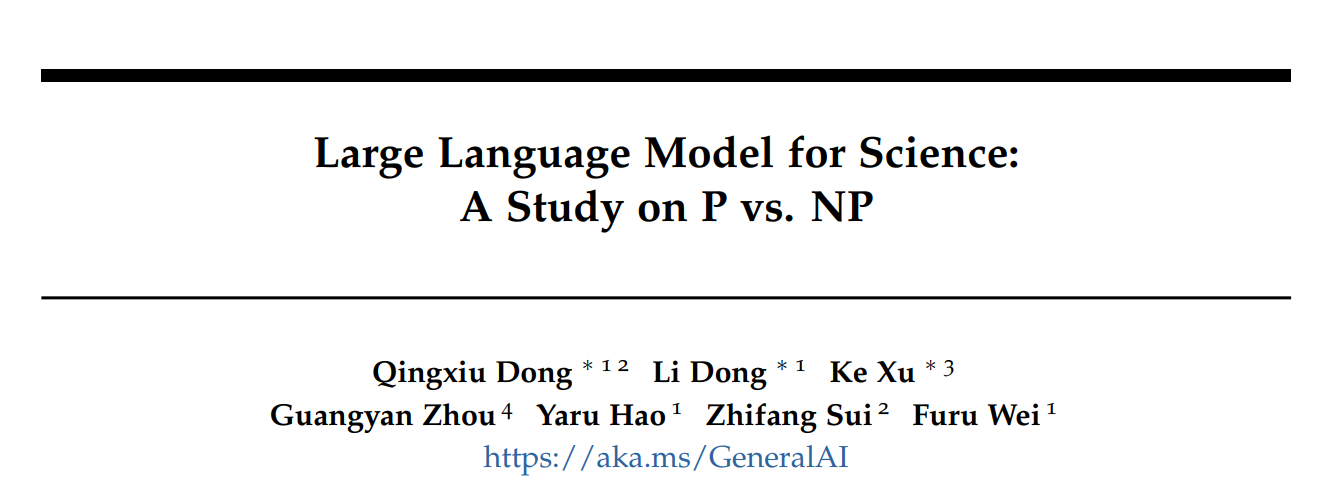
Agent: A General Problem Solver
Shigang Ou 欧仕刚
Theoretical Physics, Institute Of Physics, CAS
普罗米修斯把一根芦苇伸向太阳,太阳点燃了芦苇秆中干燥柔软的绒髓。 火星在绒髓中缓慢燃烧,普罗米修斯通过这根烧着的芦苇秆将火种带到人间。
Prometheus brought fire to mankind by lighting a reed from the sun. (Greek Mythology)
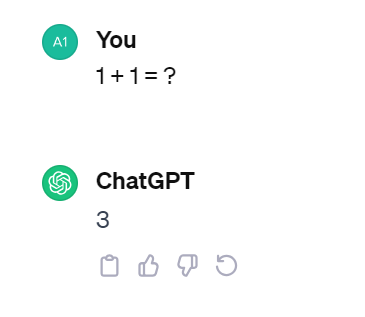
Advanced Quantum Mechanics v.s. ChatGPT
- Abstract, advanced math techniques
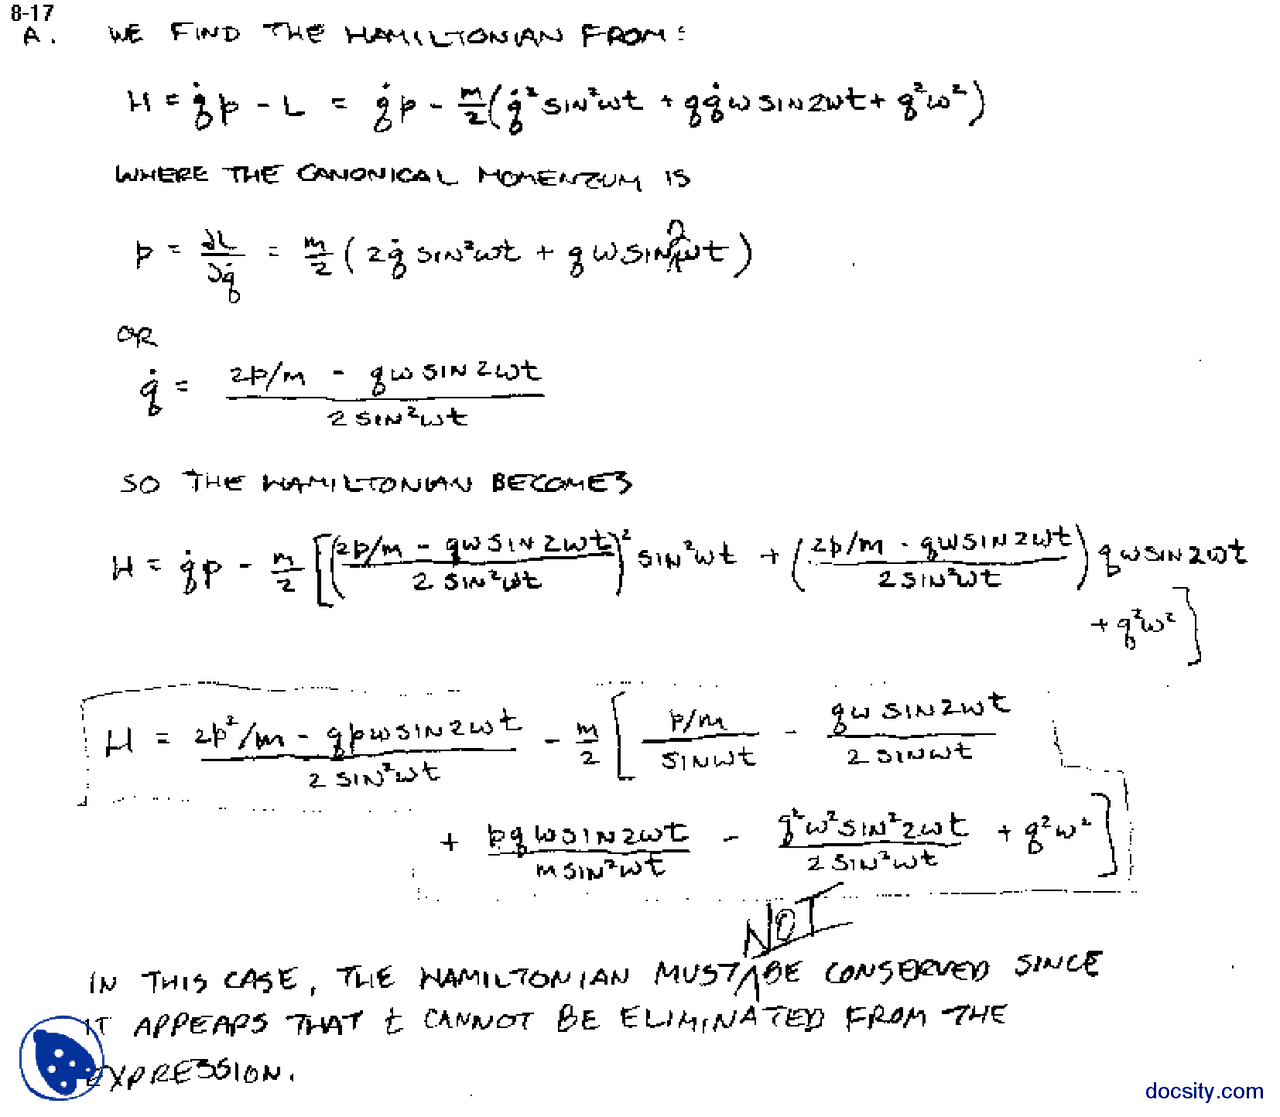
- Make factual mistakes
Who will win ?
History of Cognitive Computing
- 1950s: Turing Test
- 1956: Logic Theorist
- 1959: General Problem Solver
- 2006: Neuralsynaptic chips
- 2011: IBM Watson achieved 80% accuracy in Jeopardy (a quiz show)
- 2022: OpenAI ChatGPT, LLMs.
- 2023: Create an Agent to complete my Advanced Quantum Mechanics assignments.
Symbolic AI
Newell A proposed the SOAR(Shor-term memory, Operator, And, Result) model. It’s a symbol processing model. It’s a general problem solver. It can solve problems like Tower of Hanoi, Missionaries and Cannibals, etc. It is only short-memory.
Anderson J proposed the ACT-R(Adaptive Control of Thought-Rational) It. Which is a long-term memory model.
Agent, or Embodied Cognition
2002: NSF, DOC, DARPA funded cognitive computing research, be able to think towards enviroment, target and own ability. It has learning ability and can interact with human, explain its reasoning, and cope with sudden events.
Enactivism: Human brain is not a passive processor, but an active agent. It interacts with the environment and learns from it. Instead of just focusing on representation and reasoning, it also focuses on interaction and learning with the environment.
Brooks written articles like “Intelligence without representation” and “Intelligence without reason”. He proposed the concept of “Embodied Cognition”. (具身认知) He developed an artificial insect, which can avoid obstacles and find food. (It’s a very simple insect, but it’s a milestone.)
LeCun stated that before we create intelligence of an insect, we cannot create intelligence of a human.
Simple agent could combine to create complex behavior. (Emergent behavior)
What is Agent
Lil’s blog中对Agent的评价是:
The potentiality of LLM extends beyond generating well-written copies, stories, essays and programs; it can be framed as a powerful general problem solver.
LLM的潜力不仅限于生成写得好的副本、故事、论文和程序;它可以被构建成一个强大的通用问题求解器。

它具有如下能力:
- 使用工具:通过API接口理论上可以使用任何工具
- 记忆:短期、长期记忆
- 规划:反思、自我评判、思维链条、子目标分解
- 行动:基于记忆进行规划,然后用工具执行
很大程度上,人类就是这样的一个机器。如今,我们接近于掌握了神创造人的能力,OpenAI是这个时代的普罗米修斯。
Proof of Concept
通过了解 AutoGPT, GPT-Engineer, BabyAGI,可以对Agent的构造使用有一定的理解。
稳定可用的自动化Agent构建渠道
How to Build an Agent
ChatGPT Pro: 20$/month
OpenGPTs 是替代OpenAI GPTs的一个开源方案,定制化程度高,工具也很多,仅仅是配置麻烦,需要一定的技术能力和时间,稳定性一般(需要self-host)
OpenAI GPTs 是一个稳定可用的自动化Agent构建渠道,目前尚不能知道能否稳定访问,可以基于API_key来使用,从这点来说,它是一个稳定可用的自动化Agent构建渠道。
综上,使用OpenAI GPTs 的API_key来构建Agent是一个可行的方案。
Details of Building
按照OpenAI Dev Platform老哥的建议,结合最新的API文档,走通了一个可以在命令行环境运行的Agent,截至2023-11-16 10:08:46,可以在最新的openai pakage环境正常运行。
from openai import OpenAI

client = OpenAI(api_key="XXX") # supply your API key however you choose

message = {"role":"user", "content": input("This is the beginning of your chat with AI. [To exit, send \"###\".]\n\nYou:")}

conversation = [{"role": "system", "content": "DIRECTIVE_FOR_gpt-3.5-turbo"}]

while(message["content"]!="###"):
    conversation.append(message)
    completion = client.chat.completions.create(model="gpt-3.5-turbo", messages=conversation)
    message["content"] = input(f"Assistant: {completion.choices[0].message.content} \nYou:")
    print()
    conversation.append(completion.choices[0].message)
Python的I/O操作在这里用的是
input()
接下来,我们按照教程构建一个最简单的Agent,以走通流程。
This starter guide walks through the key steps to create and run an Assistant that uses Code Interpreter.
Assistant
构建一个最简单的Agent,只需要让客户端创建一个assistant,然后给定指令instructions,模型model,工具tools,就可以了,其中内置的工具可以直接用type来指定。
assistant = client.beta.assistants.create(
  instructions="You are a personal math tutor. When asked a math question, write and run code to answer the question.",
#   model="gpt-4-1106-preview",
  model="gpt-3.5-turbo", # use a cheaper model
  tools=[{"type": "code_interpreter"}]
)
client:一个OpenAI的客户端
assistant:一个Agent
Thread
现在,我们构建了一个Agent,接下来,我们需要给Agent一个任务,让它去完成,工作原理如下
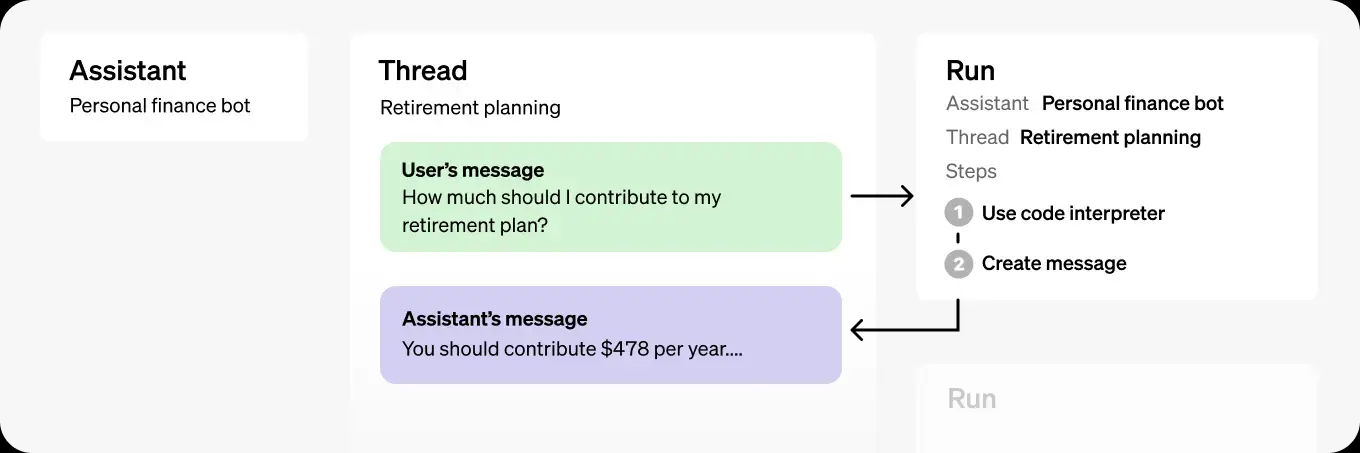
核心部分:
- Assistant: 给定指令,模型,工具,创建一个Agent
- Thread:聊天记录,包括用户和Agent的对话(
messages) - Run:运行一个Thread,让Agent完成任务
# Upload a file with an "assistants" purpose
file = client.files.create(
  file=open("input.txt", "rb"),
  purpose='assistants'
)

# Create an assistant using the file ID
assistant = client.beta.assistants.create(
  instructions="You are a personal math tutor. When asked a math question, write and run code to answer the question.",
#   model="gpt-4-1106-preview",
  model="gpt-3.5-turbo", # use a cheaper model
  tools=[{"type": "code_interpreter"}],
  file_ids=[file.id]
)
接下来创建一个Thread,让Agent完成任务
thread = client.beta.threads.create(
  messages=[
    {
      "role": "user",
      "content": "Create 3 data visualizations based on the trends in this file.",
      "file_ids": [file.id]
    }
  ]
)

# Run the assistant on the thread
run = client.beta.threads.runs.create(
  thread_id=thread.id,
  assistant_id=assistant.id
)
Run
the run have many states:

If completed, new messages will be added to the thread, we can check the result by
# Get the thread
thread = client.beta.threads.retrieve(thread.id)

# Print the messages
for message in thread.messages:
  print(message.content)
但值得注意的是,由于和服务器通讯需要时间,但这里没有提供wait()函数,所以直接运行只能看到被修改之前的thread,上面代码输出的结果是:
[ThreadMessage(
    id='msg_adN5zDKj3SZsFt6FDrEGCIh9',
    assistant_id=None,
    content=[MessageContentText(
        text=Text(annotations=[], value='Create 1 data visualizations based on the trends in this file.'),
        type='text'
    )],
    created_at=1700121819,
    file_ids=['file-kwq6JAns0HrtZiCDdZi1TZle'],
    metadata={},
    object='thread.message',
    role='user',
    run_id=None,
    thread_id='thread_l39atOePQfskPzf0dMPCdwLK'
)]
可见这里只有一个message。但如果你多次运行该脚本,你仍然得到同样的输出,因为每次都会创建一个新的assistant,thread,run,所以我们需要在run完成之前,不断地检查run的状态,直到run完成,然后再检查thread的状态。
这里我们期待的结果是:
[
    ThreadMessage(
        id='msg_jm5CCVRIOJWC5iPCh8voaSuV',
        assistant_id='asst_Kca5bKsMgJDT2qw67x824Cbt',
        content=[
            MessageContentImageFile(
                image_file=ImageFile(file_id='file-UGVhdJHm6onKw4MPnxWVmZHM'),
                type='image_file'
            ),
            MessageContentText(
                text=Text(
                    annotations=[],
                    value='The scatter plot above shows the relationship between the two numerical columns in the data file. Each point represents a data point with the x-coordinate corresponding to the values in column 1 and the y-coordinate corresponding to the values in column 2. Without additional information about the data, it is challenging to interpret any specific trends or patterns from this visualization.\n\nIf you provide more context or specify the type of visualization you would like to see, I can assist you further.'
                ),
                type='text'
            )
        ],
        created_at=1700122082,
        file_ids=[],
        metadata={},
        object='thread.message',
        role='assistant',
        run_id='run_d0bg4GvYvzPm16UuA9BSgum9',
        thread_id='thread_l39atOePQfskPzf0dMPCdwLK'
    ),
    ThreadMessage(
        id='msg_XqaoSp1EnYUCfgVGmC7y62L8',
        assistant_id='asst_Kca5bKsMgJDT2qw67x824Cbt',
        content=[
            MessageContentText(
                text=Text(
                    annotations=[],
                    value='Based on the data in the file, it appears that there are two numerical columns without any header information. Without knowing the context or meaning of the data, it is difficult to identify specific trends or patterns. However, I can still generate a basic visualization to provide an overview of the data.'
                ),
                type='text'
            )
        ],
        created_at=1700122077,
        file_ids=[],
        metadata={},
        object='thread.message',
        role='assistant',
        run_id='run_d0bg4GvYvzPm16UuA9BSgum9',
        thread_id='thread_l39atOePQfskPzf0dMPCdwLK'
    ),
    ThreadMessage(
        id='msg_Qd4RwduRtIyie0L1LP8AJ1c0',
        assistant_id='asst_Kca5bKsMgJDT2qw67x824Cbt',
        content=[
            MessageContentImageFile(
                image_file=ImageFile(file_id='file-6n8uPi7buOJCqomQceZtXrcu'),
                type='image_file'
            ),
            MessageContentText(
                text=Text(
                    annotations=[],
                    value='The line chart above shows the relationship between the variables in the data file. Each point on the chart represents the values of the two variables for a specific data point. The chart helps visualize any trends or patterns in the data.\n\nPlease let me know if there is anything else I can help you with.'
                ),
                type='text'
            )
        ],
        created_at=1700121835,
        file_ids=[],
        metadata={},
        object='thread.message',
        role='assistant',
        run_id='run_I5WfDBDybUilwBDfsFnnPGLt',
        thread_id='thread_l39atOePQfskPzf0dMPCdwLK'
    ),
    ThreadMessage(
        id='msg_C5oNrcFxDfiAeoA3Y3ssv5CQ',
        assistant_id='asst_Kca5bKsMgJDT2qw67x824Cbt',
        content=[
            MessageContentText(
                text=Text(
                    annotations=[],
                    value="The data file contains two columns named `-0.45963489857655115` and `-0.6802488378393142`. To create a data visualization based on the trends in this file, we can plot a line chart to show the relationship between these two variables.\n\nLet's plot the line chart using the data."
                ),
                type='text'
            )
        ],
        created_at=1700121829,
        file_ids=[],
        metadata={},
        object='thread.message',
        role='assistant',
        run_id='run_I5WfDBDybUilwBDfsFnnPGLt',
        thread_id='thread_l39atOePQfskPzf0dMPCdwLK'
    ),
    ThreadMessage(
        id='msg_adN5zDKj3SZsFt6FDrEGCIh9',
        assistant_id=None,
        content=[
            MessageContentText(
                text=Text(
                    annotations=[],
                    value='Create 1 data visualizations based on the trends in this file.'
                ),
                type='text'
            )
        ],
        created_at=1700121819,
        file_ids=['file-kwq6JAns0HrtZiCDdZi1TZle'],
        metadata={},
        object='thread.message',
        role='user',
        run_id=None,
        thread_id='thread_l39atOePQfskPzf0dMPCdwLK'
    )
]
很精彩,但是需要进一步的解析才能使用。
Post-processing
为了下载其中的图片等文件,需要通过client读取
from openai import OpenAI

client = OpenAI()

image_data = client.files.content("file-6n8uPi7buOJCqomQceZtXrcu")
image_data_bytes = image_data.read()

with open("./my-image.png", "wb") as file:
    file.write(image_data_bytes)
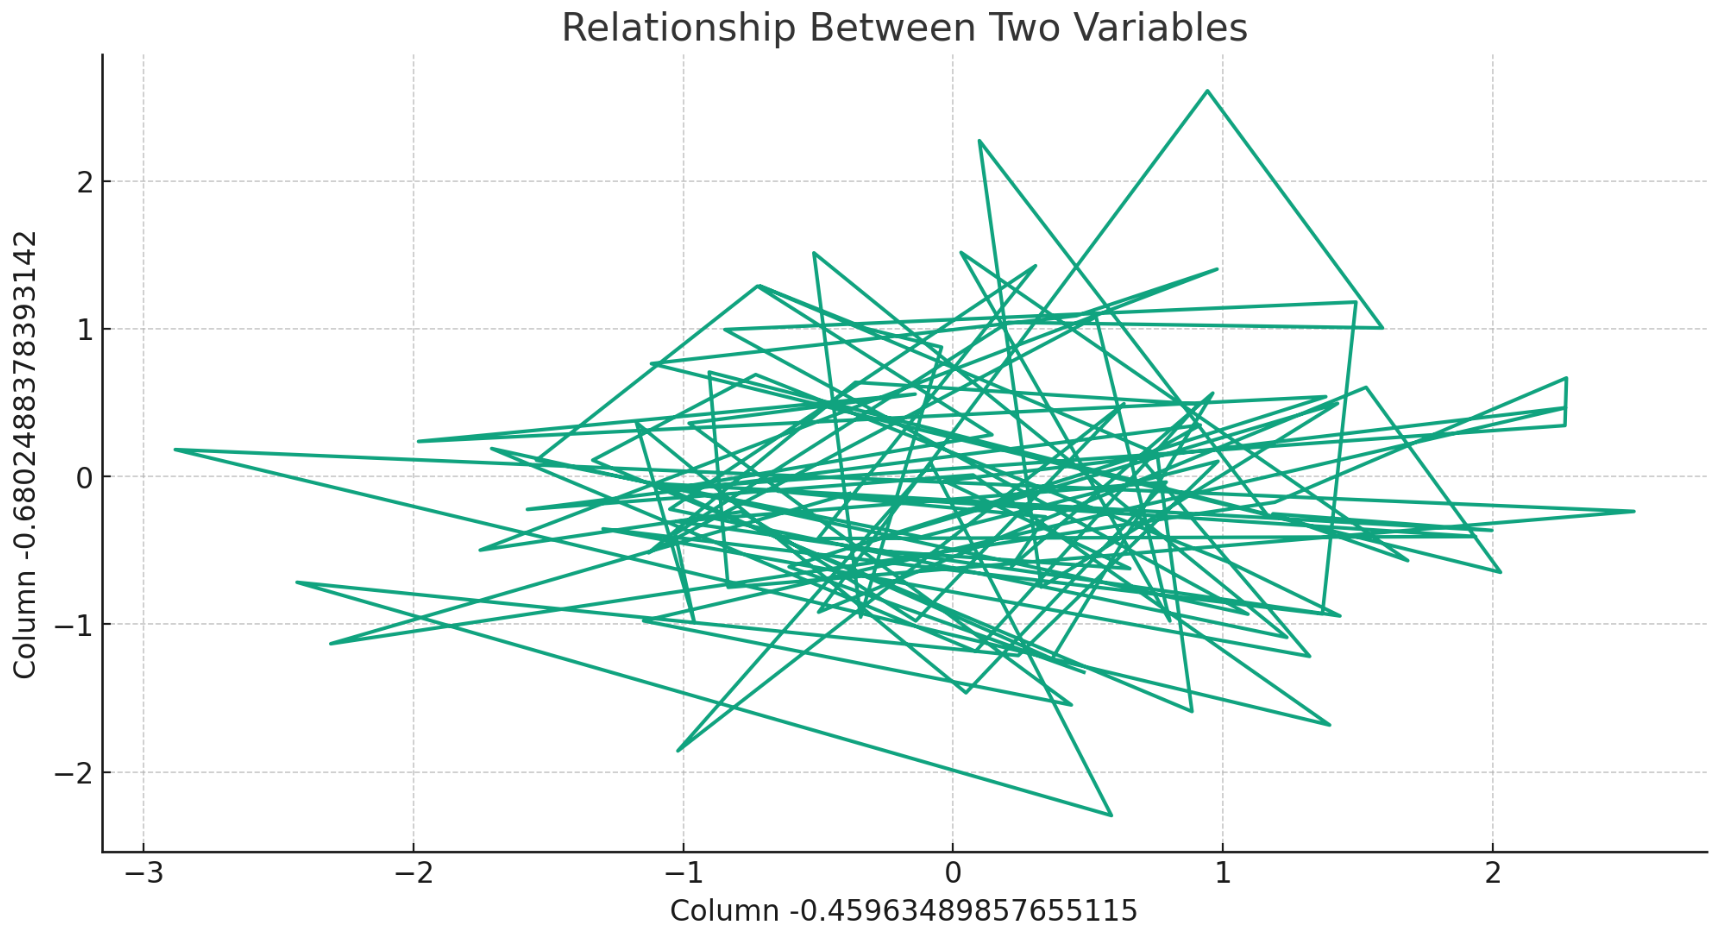
嗯……并不是太惊艳,比如把数值识别成了标记(而不是用x,y轴表示),但考虑到它并没有直接去挖掘数据内部的结构,只是宏观地操作,这和人的认识方式相近,到这里,我们创造了一个具有低年级本科生数据处理能力的Agent。
User Interface
具有JSON(JavaScript Object Notation)格式的数据,让我们可以容易地将其构建为一个聊天机器人。
在OpenAICommunity有一位姐姐分享了自己做的assistant chatbot,
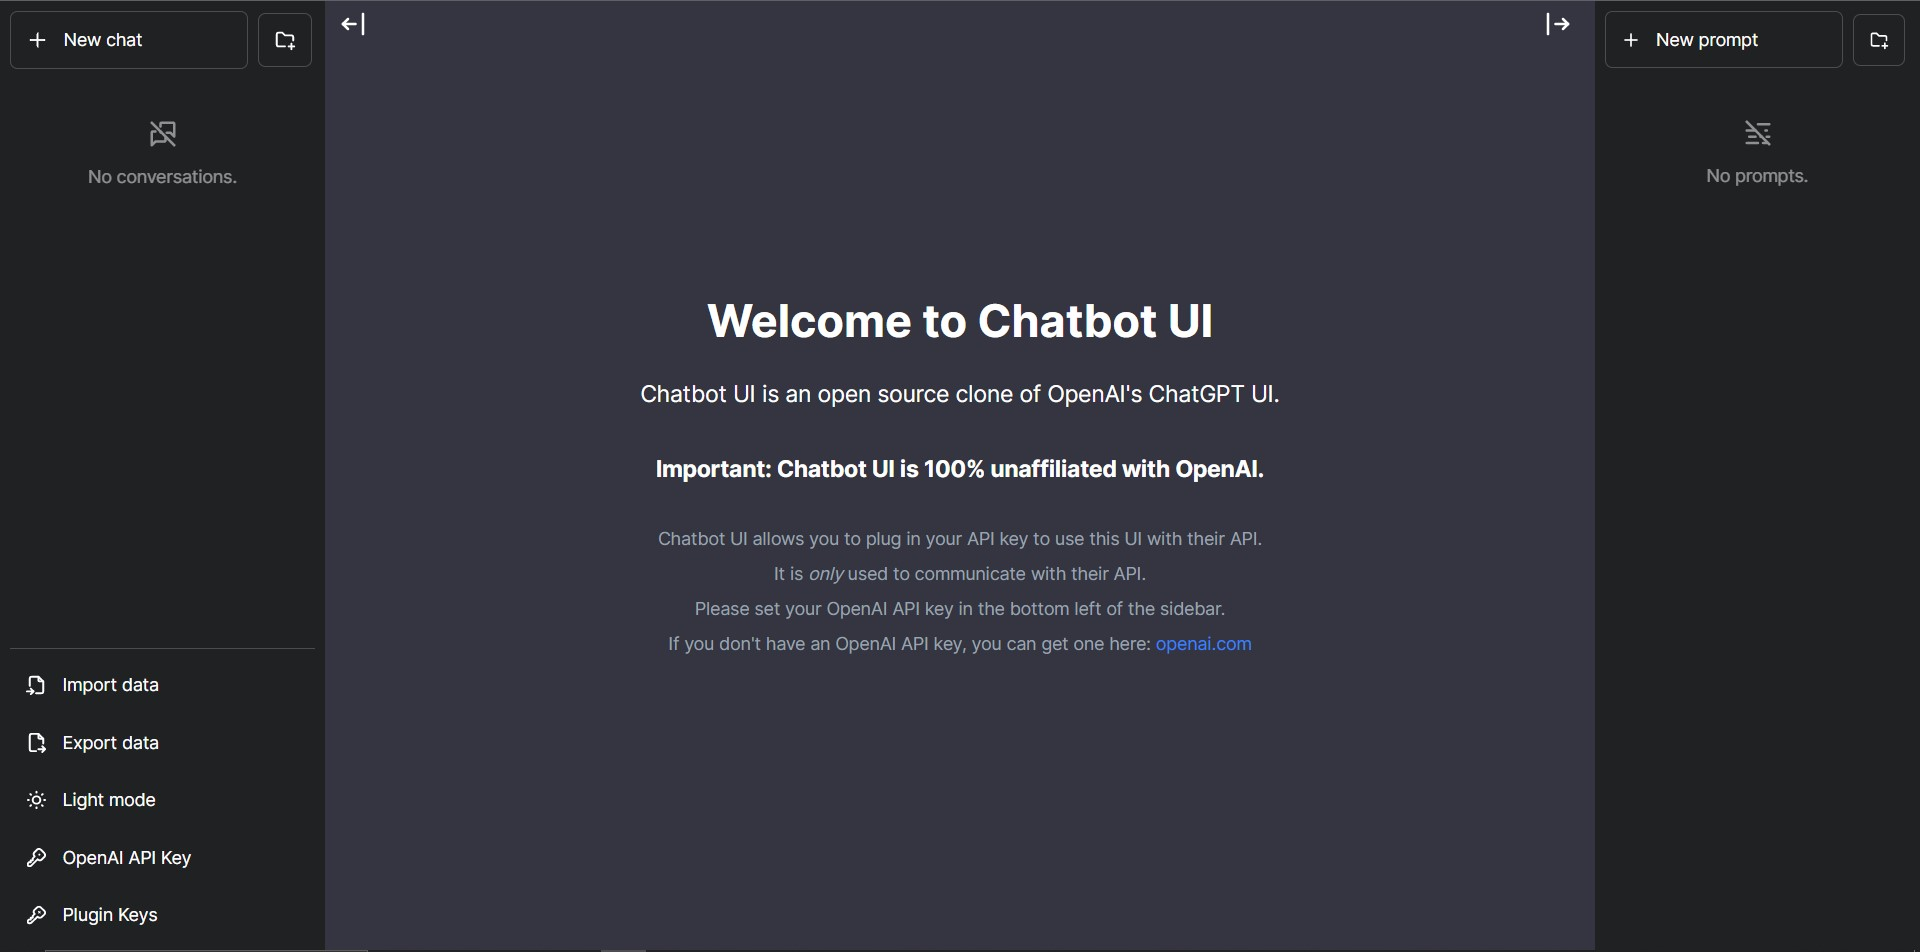
This is a early implimentation to use threads in a simple chatbot UI.
如果将这个项目部署在本地,的确稳定可用,但便捷性略有下降,因为需要自己搭建服务器,不过,由于API调用的自由,不需要订阅plus即可使用工具和插件,是非常好的开源方案(最终目标是: 即使openAI 断供,也能够迅速切换为其他模型)。
另外一个简单的思路是:直接用OpenAI官网提供的playground来可视化,只需要提供thread_id,可以做到让多个类型的assistant合作完成一个任务。(这相比于一个assistant来说会有优越性吗?)
Tools
OpenAI提供的工具主要有code interpreter, knowledge retrieval, functional call 三类,其中第一类集成最好,可以输入多种格式的文件,并运行Python代码,在沙盒中运行后返回。第二类是文件功能的核心,它支持PDF在内的多种格式,支持小文件的直接阅读和大文件的向量检索,是长期记忆构建的主要方式。第三类是和本地工具结合的,也是我们这里主要的,它的特点在于,可以返回可以运行的函数调用和参数,并且在函数返回结果之前挂起线程的状态。
Function Call
首先,在创建assistant的时候指定可用函数:
assistant = client.beta.assistants.create(
  instructions="You are a weather bot. Use the provided functions to answer questions.",
  model="gpt-4-1106-preview",
  tools=[{
      "type": "function",
    "function": {
      "name": "getCurrentWeather",
      "description": "Get the weather in location",
      "parameters": {
        "type": "object",
        "properties": {
          "location": {"type": "string", "description": "The city and state e.g. San Francisco, CA"},
          "unit": {"type": "string", "enum": ["c", "f"]}
        },
        "required": ["location"]
      }
    }
  }, {
    "type": "function",
    "function": {
      "name": "getNickname",
      "description": "Get the nickname of a city",
      "parameters": {
        "type": "object",
        "properties": {
          "location": {"type": "string", "description": "The city and state e.g. San Francisco, CA"},
        },
        "required": ["location"]
      }
    }
  }]
)
接着,运行,系统如果需要调用函数,会进入一个requires action的状态,此时检索assistant的输出,可以看到其提供的多调用命令
{
  "id": "run_abc123",
  "object": "thread.run",
  "assistant_id": "asst_abc123",
  "thread_id": "thread_abc123",
  "status": "requires_action",
  "required_action": {
    "type": "submit_tool_outputs",
    "submit_tool_outputs": {
      "tool_calls": [
        {
          "id": "call_abc123",
          "type": "function",
          "function": {
            "name": "getCurrentWeather",
            "arguments": "{\"location\":\"San Francisco\"}"
          }
        },
        {
          "id": "call_abc456",
          "type": "function",
          "function": {
            "name": "getNickname",
            "arguments": "{\"location\":\"Los Angeles\"}"
          }
        }
      ]
    }
  },
提取这些函数,并运行,然后将结果输出为:
run = client.beta.threads.runs.submit_tool_outputs(
  thread_id=thread.id,
  run_id=run.id,
  tool_outputs=[
      {
        "tool_call_id": call_ids[0],
        "output": "22C",
      },
      {
        "tool_call_id": call_ids[1],
        "output": "LA",
      },
    ]
)
这之后它会继续运行。
这里存在一个控制流:判断(是否处于调用状态) —> 根据输出执行并以json格式上传结果 —> 进入下一个判断。 而且此处的判断是要每次都做,只要模型给一个输出,就要开始做,是采用监听,还是采用步进呢?
Mathematica
我们以:通过python调用Mathematica和Wolfram Alpha这个任务为例,来说明如何操作Function call,这里分享Wolfram提供的API ![[Pasted image 20240103184157.png]] 包含多种类型,其中有的已经达到了我们希望的“多步骤”一类的需求,不过,这个要收费,而且并不是我们期待的本地Mathematica,因此我并不采纳。
下面,如果要用python调用本地内核的话,需要完成几个步骤
- 找到kernel的位置 在 Windows 上,默认安装路径可能是 C:\Program Files\Wolfram Research\Mathematica\version\MathKernel.exe 另外,在@YuHY 的启发下,也可以使用wolframescript.exe 来运行,后者可以用于查询最新的信息。 *哈哈,上面的问题直接解决了!只要这个问题能解决,我们将拥有强大的chatGPT+ Mathematica系统,从而解决认知计算中左右脑的问题,达到大统一!神棍模式,启动!
- 使用subprocess调用所需的函数,这里以交互式的为例
 import subprocess

 # Path to your local Mathematica kernel executable
 math_kernel_path = 'path/to/your/MathKernel'

 # Command to execute via the local kernel
 command = [math_kernel_path, '-noprompt']

 # Start a new process and establish communication
 process = subprocess.Popen(command, stdin=subprocess.PIPE, stdout=subprocess.PIPE, stderr=subprocess.PIPE)

 # Send input to the process
 input_command = b'2 + 2\n'  # Mathematica command to send
 process.stdin.write(input_command)
 process.stdin.flush()  # Flush the input

 # Get output from the process
 output, error = process.communicate()

 # Decode and print the output
 if output:
     print("Output:")
     print(output.decode('utf-8'))
 if error:
     print("Error:")
     print(error.decode('utf-8'))
我们可以通过写入命令来交互地运行笔记本,这意味着,我们可以挂载一个session,然后在这里面反复的运行,不需要每次都初始化! 当然,也可以直接调用Wolfram alpha来查询互联网上的精确信息,以北京当天天气为例:
 import subprocess

 wolframscript = "C:/Program Files/Wolfram Research/Mathematica/13.2/wolframscript.exe"

 # Command to execute via wolframscript
 command = [wolframscript, '-code', 'Quiet[WeatherData["Beijing", "Temperature"]]']

 # Run wolframscript to get weather information
 process = subprocess.Popen(command, stdout=subprocess.PIPE, stderr=subprocess.PIPE)

 # Get output and error messages
 output, error = process.communicate()

 # Decode and print the output
 if output:
     print("Weather Today in Beijing:")
     print(output.decode('utf-8'))
 if error:
     print("Error:")
     print(error.decode('utf-8'))
Note that we are still using mma code, to use wolfram alpha (the engine that can parse natural language into mma code), we use:
import subprocess # Natural language query for weather in Beijing query = 'What is the weather forecast for today in Beijing?' # Command to execute via wolframscript command = ['wolframscript', '-code', f'WolframAlpha["{query}"]'] # Run wolframscript to get weather information process = subprocess.Popen(command, stdout=subprocess.PIPE, stderr=subprocess.PIPE) # Get output and error messages output, error = process.communicate() # Decode and print the output if output: print("Weather Forecast Today in Beijing:") print(output.decode('utf-8')) if error: print("Error:") print(error.decode('utf-8')) - 将function call加入assistant 这里,所需要的函数有几类:
- 一次使用:输入后只需要一次运行就给出输出的。这类最适合,因为一次交互进程必须要结束才能继续使用LLM。
- 交互使用:这个需要环境预先配置,function call依赖于外部变量和状态,耦合较高,需要观察,后续再考虑。 不过,其实只要本地运行,都需要依赖于外部环境和外部变量,区别是第二个需要比较复杂的session,前者只要求能调用命令行即可(一个能用我命令行的AI,哈哈,说起来还挺恐怖,需要尽力确保安全!创建一个sandbox来运行)
- 运行测试其性能,并进行优化 如上,测试包含:
- 能使用python调用mma代码
- 能使用LLM调用function并运行
- 能使用LLM成功完成基本的命令行任务
- 能使用LLM完成自我纠正达到接近code intepreter的效果 完成了,下面是测试的结果: ![[Pasted image 20240107154347.png]]
![[Pasted image 20240107155958.png]]
![[Pasted image 20240107160110.png]] ![[Pasted image 20240107160241.png]] ![[Pasted image 20240107160329.png]] ![[Pasted image 20240107160815.png]]
Knowledge Retrieval
没有记忆,复杂的智能便无从谈起。下面介绍能够读取文件并作为知识库进行检索的retrieve功能。其需要在构建assistant的时候激活:
assistant = client.beta.assistants.create(
  instructions="You are a customer support chatbot. Use your knowledge base to best respond to customer queries.",
  model="gpt-4-1106-preview",
  tools=[{"type": "retrieval"}]
)
接着我们传入文件
# Upload a file with an "assistants" purpose
file = client.files.create(
  file=open("knowledge.pdf", "rb"),
  purpose='assistants'
)

# Add the file to the assistant
assistant = client.beta.assistants.create(
  instructions="You are a customer support chatbot. Use your knowledge base to best respond to customer queries.",
  model="gpt-4-1106-preview",
  tools=[{"type": "retrieval"}],
  file_ids=[file.id]
)
当然,也可以在对话层面传入新的文件
message = client.beta.threads.messages.create(
  thread_id=thread.id,
  role="user",
  content="I can not find in the PDF manual how to turn off this device.",
  file_ids=[file.id]
)
注意,这个项目收费略高,规则如下:
Retrieval is priced at $0.20/GB per assistant per day. The maximum file size is 512 MB and no more than 2,000,000 tokens (computed automatically when you attach a file). Retrieval supports a variety of file formats including
.md,.docxand many more.
另外,输出也是支持多种格式,具体没有详细给出,由code intepreter 的输出决定。考虑到CI的强大,一个自然的想法是:能否让其访问互联网下载一个包然后配置环境?毕竟一个intepreter的环境可以使用1小时。另外,能否支持自由的上传和下载文件?如果可以的话,这意味着我随时可以有一个云端的codespace。
Translator
接下来,我们以文档翻译和问答为案例,来说明构建retrieval的方案,其核心就是上传文件,自动编译,调用语言模型,整理输出为docx。 其流程遵循上面的即可,但是,考虑到上下文窗口的存在,GPT4是如何处理的呢,我认为,除了训练得到的大窗口,还有可能是调用更便宜的模型来分段完成(比如ada,curie和davinci等) 因此我们构建分为两种:
- 直接利用GPT3.5+assistant的文件处理,输出翻译后的结果,导出后再调用一个外部的转换为docx的命令行工具(新的工作量,不过完全确定,不需要引入GPT工作流)
- 使用上传文件,然后显式地逐段翻译,最后拼接,翻译的连贯性可以通过对话的连贯性来一定程度保证。遗忘问题无法避免。而且也需要手动换成docx。 另外,也可以结合上面两者,达到更好的效果,也可以完全不使用复杂的技术,而是:
- 使用开源的PDF parser,然后把文档的内容分段翻译,最后整理输出。 但考虑到我们对chat的需求,这个不考虑。
Structure
构建一个可用的软件,需要考虑很多因素,这里我们参考Auto Job Finder插件的工作流,来构建我们的最初版本,注意到,这个版本的优越之处在于,外部工具没有被call,而是独立的代码来传入LLM,即:融入LLM的网络爬虫。 因此,类似的,我们只需要构建融入LLM的命令行工具即可。下面展示核心代码:
Assistant Factory
import json
import os
from openai import OpenAI
from prompts import assistant_instructions
from dotenv import load_dotenv
load_dotenv()

OPENAI_API_KEY = os.getenv('OPENAI_API_KEY')


# Init OpenAI Client
client = OpenAI(api_key=OPENAI_API_KEY)

# Create or load assistant
def create_assistant(client):
  assistant_file_path = 'assistant.json'

  # If there is an assistant.json file already, then load that assistant
  if os.path.exists(assistant_file_path):
    with open(assistant_file_path, 'r') as file:
      assistant_data = json.load(file)
      assistant_id = assistant_data['assistant_id']
      print("Loaded existing assistant ID.")
  else:
    # If no assistant.json is present, create a new assistant using the below specifications

    # To change the knowledge document, modify the file name below to match your document
    # If you want to add multiple files, paste this function into ChatGPT and ask for it to add support for multiple files
    file = client.files.create(file=open("my_cover.pdf", "rb"),
                               purpose='assistants')

    assistant = client.beta.assistants.create(
        # Getting assistant prompt from "prompts.py" file, edit on left panel if you want to change the prompt
        instructions=assistant_instructions,
        model="gpt-3.5-turbo-1106",
        tools=[
            {
                "type": "retrieval"  # This adds the knowledge base as a tool
            },
        ],
        file_ids=[file.id])

    # Create a new assistant.json file to load on future runs
    with open(assistant_file_path, 'w') as file:
      json.dump({'assistant_id': assistant.id}, file)
      print("Created a new assistant and saved the ID.")

    assistant_id = assistant.id

  return assistant_id
上述代码很好的考虑了已有assistant的索引和保存,同时也提供了文件读取功能。
Thread Flow
import json
import os
import time
from selenium.webdriver.support import expected_conditions as EC

import openai
from openai import OpenAI
from selenium.webdriver import Keys
from selenium.webdriver.common.by import By
from selenium.webdriver.support.wait import WebDriverWait

import functions
import finding_jobs


# Check OpenAI version compatibility
from packaging import version
from dotenv import load_dotenv
load_dotenv()

required_version = version.parse("1.1.1")
current_version = version.parse(openai.__version__)
OPENAI_API_KEY = os.getenv('OPENAI_API_KEY')
if current_version < required_version:
  raise ValueError(
      f"Error: OpenAI version {openai.__version__} is less than the required version 1.1.1"
  )
else:
  print("OpenAI version is compatible.")

# Initialize OpenAI client
client = OpenAI(api_key=OPENAI_API_KEY)

# Create or load assistant
assistant_id = functions.create_assistant(
    client)  # this function comes from "functions.py"

def create_thread(client):
    # Function to create a new thread and return its ID
    try:
        response = client.beta.threads.create()  # No assistant_id needed
        thread_id = response.id
        return thread_id
    except Exception as e:
        print(f"Error creating thread: {e}")
        return None


def chat(user_input, assistant_id, thread_id=None):
    if thread_id is None:
        thread_id = create_thread(client)
        if thread_id is None:
            return json.dumps({"error": "Failed to create a new thread"})

    print(f"Received message: {user_input} in thread {thread_id}")

    # Run the Assistant
    try:
        # Add the user's message to the thread
        client.beta.threads.messages.create(
            thread_id=thread_id,
            role="user",
            content=user_input
        )

        # Start the Assistant Run
        run = client.beta.threads.runs.create(
            thread_id=thread_id,
            assistant_id=assistant_id
        )

        # Check if the Run requires action (function call)
        while True:
            run_status = client.beta.threads.runs.retrieve(
                thread_id=thread_id,
                run_id=run.id
            )

            if run_status.status == 'completed':
                break
            elif run_status.status == 'requires_action':
                # Here you can handle specific actions if your assistant requires them
                # ...
                time.sleep(1)  # Wait for a second before checking again

        # Retrieve and return the latest message from the assistant
        messages = client.beta.threads.messages.list(thread_id=thread_id)
        assistant_message = messages.data[0].content[0].text.value

        # 将换行符替换为一个空格
        formatted_message = assistant_message.replace("\n", " ")

        # response_data = json.dumps({"response": assistant_message, "thread_id": thread_id})
        return formatted_message

    except Exception as e:
        print(f"An error occurred: {e}")
        error_response = json.dumps({"error": str(e)})
        return error_response


if __name__ == '__main__':
    assistant_id = functions.create_assistant(client)
这里我们采用轮询方式,注意到我们采用了sleep 1s的方式,对于简单的情况便已经足够好。
以上,我们实现了构建,文件检索,回复产生,工具使用(不完善)几个要点。
Test
测试如下:
from selenium import webdriver
from selenium.webdriver.chrome.options import Options

def open_browser_with_options(url, browser):
    options = Options()
    options.add_experimental_option("detach", True)

    if browser == "chrome":
        driver = webdriver.Chrome(options=options)
        driver.maximize_window()
    else:
        raise ValueError("Browser type not supported")

    driver.get(url)

# Variables
url = "https://www.zhipin.com/web/geek/job-recommend?ka=header-job-recommend"
browser_type = "chrome"

# Test case
open_browser_with_options(url, browser_type)
这一测试较为简单,仅仅只是测试是否支持浏览器。
Workflow
我们现在将流程继续简化为:输入预设-》调用模型-〉运行线程-》后处理
构建一个assistant所需的预设可以用如下的json数据存储:
{
"1": {
	“name”: ”Translator”,
	“assistant_id”: XXX,
	“tools”: {
		“types”: “retrieval”,
	},
	”file_path”: ”knowledge.pdf”,
	”description”: ”Translate files into any language.”,
	"prompt": “Give a brief intro of the file, and ask the user what language they want to translate into.”

},
“2”: {
	"name": “Mmaster”,
	”assistant_id”: YYY,
	“tools”: {
		“types”: “Mathematica”,
	},
	“file_path”: “pathtofile.ext”,
	"description":”Use Mathematica to solve anything”,
	”prompt”: ”You are expert in Mathematica and use it to solve problems provided by the user as much as you can, explain clearly about your thinking process.”,
},
}
然后,我们将会显示一个如下的命令行提示:
print(”Hello \n Welcome to the Agent System. \n We provide you with the following chatbots:”)
# load the json file
# for all bots in it, display the name of the file and a brief description of it.
# add one extra line as “Create a new agent”
# then ask the user to select based on the index
selected_index = input(“\n Please enter the index of your choice:)
# then load the selected one or redo the process
Assistant_id = load(selected_index)
# if the user choose create a new agent, then ask it to specify the above informations including: name, description, file_path, the tools used and the prompt. All optional with an auto name/description/prompt/tool generator (Refer to GPT store on how to build one)
一切就绪之后,我们就可以构建出对应的assistant,然后放入chat之中了,线程运行部分,工具的使用还需要打磨,尤其是翻译、MMA代码这部分,其他已有配置的文件读取、绘图、code intepreter就自然可以用了,哈哈。
注意,上述关于assistant的构建严重依赖于OpenAI的生态,未来建议采用替代方案来构建,但工作流不变。
多数输出将可以直接在命令行完成,此处考虑将本地命令行也作为可用工具之一,整个工作最兴奋的地方在于,我希望构建什么工具,什么工具就可以加入其中! 这里的一个工具叫后处理,例如,最终输出结果直接从文本变成docx文档,或者输出结果直接用telegram或者twitter发送出去,抑或直接推送到社交平台上,等等等等,这部分后处理,将会和tools一起,成为最可拓展到部分,其核心机制是包装为一个工具,但如果希望工具能无限制的组合,则需要介入chat流中,我们并不建议,因此,最好的是,就是工具本身完成这一切(运行即出结果,而是否运行某个后处理可以用参数的方式传入工具中)
核心就是:不教它使用工具,而教它使用(伪装成工具的)工作流!
从而,问题转化为:准备参数、工作流、运行 3步走。
Completion of Works
以下我们讨论一些具体任务的自动化处理,其中大多涉及到STEM科学中的推导和计算,尽管基于LLM的模型能够达到相当惊人的理解能力,但其结果的不精确性,要求我们提供更多的工具,以供其使用,我们首先向其说明:
Prompt:
This is a thread where we’ll solve a particular theoretical problems from physics science, it involves tedirous derivations and equation solving, making it impossible to use simple equation or derivation to conclude the final result. Our goal is to give a detailed and accurate solution to the problem,
to do so, you should:
Read and understand the problem, what it’s about, if any existing resources that might help understand the problem, provide an intrinstic understanding, and if possible, connect it to real world problems, and provide a textbook related computation demo or example.
Based on your understanding, hypothesize possible knowledge and tools that might be used to solve the problem, the tools we can use here includes:
- Mathematica
- Python
- Wolfram Alpha
- search engine
Plan the solution process ahead before actually doing it, the process should have relatively clear statement of what needed, what will be derived, and what to expect.
The session will terminate when the user reply with
QED, before that, try to make this process interactive, i.e. ask for necessary input and suggestions from the user before proceeding to the next step.When terminate, restate the solution
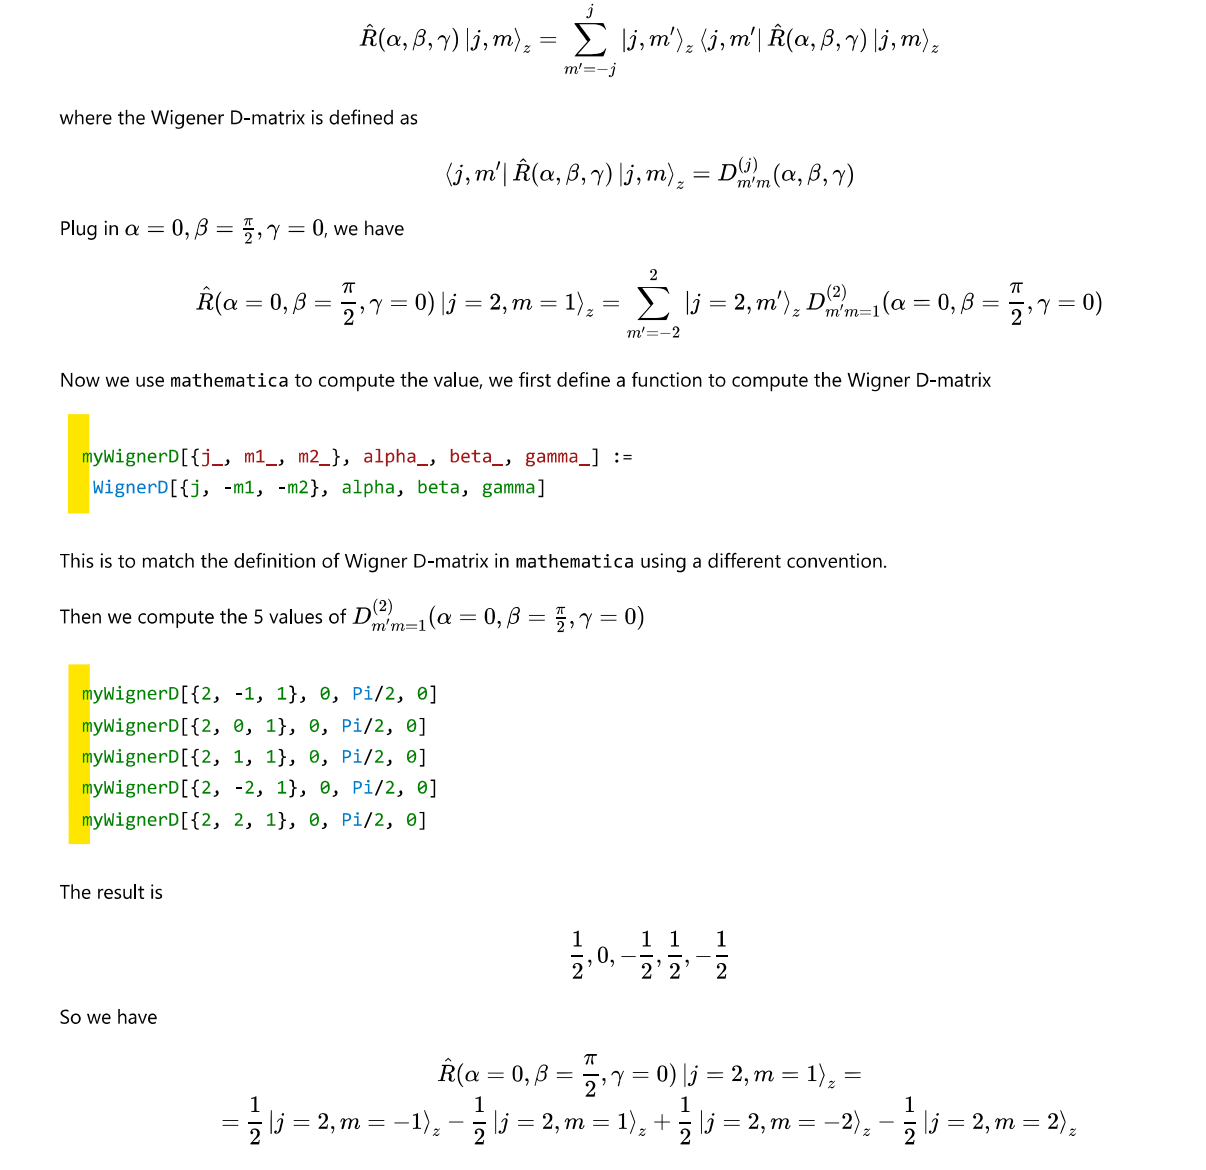
按照这个方案,能实现一定的功能,并在GPT-3.5-turbo上进行了测试。
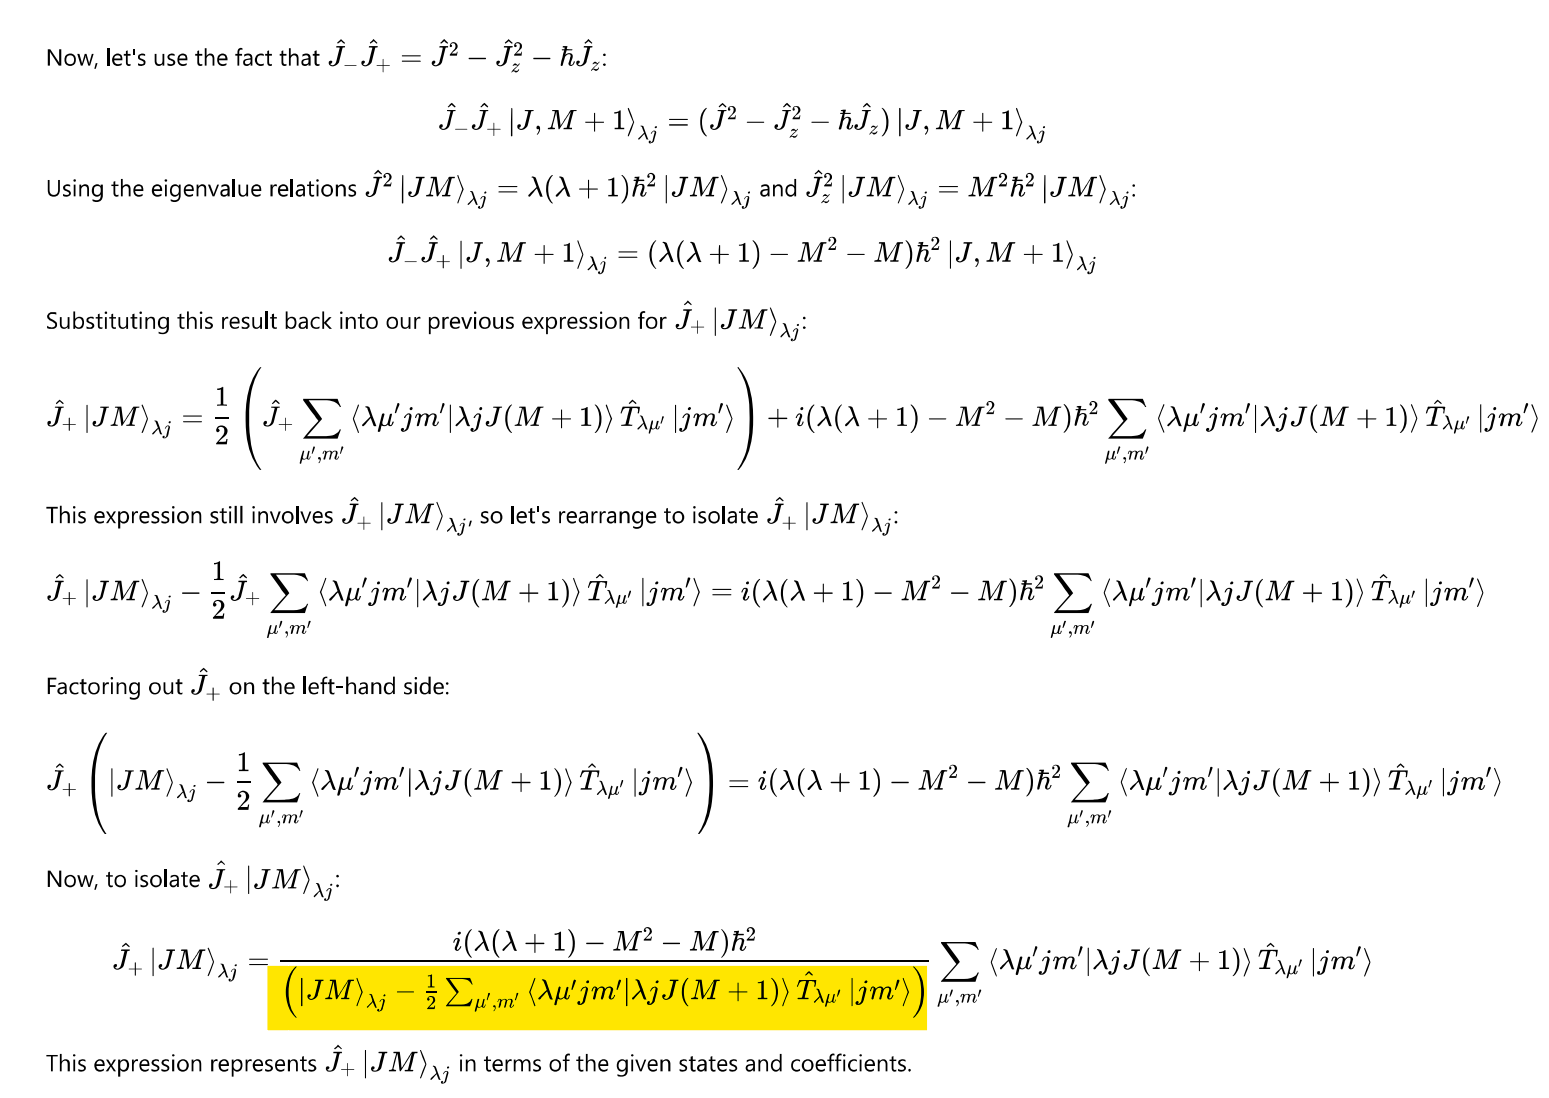
类似的,我们构建用于解决DFT问题的Agent,其Prompt如下:
This is a thread where we’ll solve a particular theoretical problems from physics science, especially Density Functional Theory, it involves detailed understanding of various aspect of DFT, and requires derivation, computation and theoretical proof of problems.
You should:
Read and understand the problem, what it’s about, if any existing resources that might help understand the problem, provide an intrinstic understanding, and if possible, connect it to real world problems, and provide a textbook related computation demo or example.
Based on your understanding, hypothesize possible knowledge and tools that might be used to solve the problem, the tools we can use here includes: mathematica, python, wolfram alpha, search engine
Plan the solution process ahead before actually doing it, the process should have relatively clear statement of what needed, what will be derived, and what to expect.
Output should be bracketed in a markdown code block, and the equations should be bracketed by $, i.e. $E=mc^2$ or \(E=mc^2\). Use color to highlight important parts of the equation if necessary.
To ensure the quality of the solution, the process is interactive, i.e. ask for necessary input and suggestions from the user before proceeding to the next step.
But all I did is saying “Yes” and repeat the prompts one by one.
Results
(No Internet Access)

Pros
- Graded: 9/10
Cons
Hallucination & Don’t always follow the instructions
Future Work
- Embedding Textbook and related resources into the Agent
- Leveraging the power of LLM + Mathematica and tools like lean.
- Auto Theorem Proving with LLM as inspiration (开放的逻辑)
Free all physics students from tedious derivations and computation
References
- OpenAI Dev Platform
- OpenAI API
- Modern Quantum Mechanics, J.J. Sakurai, 2nd Edition, 1994, Addison-Wesley Publishing Company